- Joined
- May 25, 2022
- Messages
- 608
- Gallery
- 295
- Reaction score
- 1,507
- Location
- Sacramento/Tahoe
- Current Ride
- 2022 Bronco Raptor
- Current Ride #2
- 2023 Land Rover Defender 110
This is going to be a two part summary. Part 1 is modifications necessary to allow the Foutz skids to work with RCI Frame Mount sliders (and probably similar to other frame mount sliders). Part 2 will focus on the installation of the modified sliders.
The Foutz skids arrived well packaged in perfect condition, stout like all their products and included all the necessary hardware. Note: it was impossible to tell if I received the necessary hardware as there was no packing list, no mention or pictures of the parts in the instructions and the instructions were incorrect and indicated many more parts were required or optional than were received. I think these were Bronco instructions labeled as Raptor instructions. However, they are supposed to update to the correct instructions today on their web site.
The Foutz skids have a “tongue“ that lays along the frame at the front of the skid. Unfortunately, my RCI frame mounted sliders have a bracket that lays partway across the bottom of the frame on the drivers side where the Foutz Skid tongue needs to mount. Fortunately, there is enough space for them to lay next to each other if you remove about a third of the width of the tongue. I figured that they should lay flat next to each other as the drivers side skid tongue does not bolt down.
Laying the tongue on top of the slider bracket won’t work as the mounting holes on the skid won’t line up with the frame bracket holes.
After test fitting and measuring (three times) I used some blue tape to mark the area to be removed. Using a hand grinder with cut-off wheel, I made two cuts to remove the taped area. As expected, I needed to remove a little more metal on the leading edge cut, so I used a grinding wheel next to remove a little more material and chamfer the edge. I did a test fit or two to arrive at the right amount of material to remove. All in all, not a difficult modification. Just took couple hours with painting.
Ultimately, the drivers side skid bolted in easily. The passenger side is sadly still a work in progress. More on that in Part 2!
The first picture shows the area to be removed covered in blue tape on each skid (NOTE: the passenger side skid does not need to be modified for the RCI slider. the passenger side RCI covers the entire frame width, and the Foutz skid can lay on top of the RCI and under the OEM tank skid. Then the tank skid bolt sandwiches all of this together).
It also shows the correct hardware pack and nut plates.

This shows the two cuts I made with a hand grinder and cut-off wheel.

This shows the amount I ground off the leading edge, it’s angled to achieve the fit, but not dig into the HDPE. I filed, primed and painted the exposed edges prior to installing.

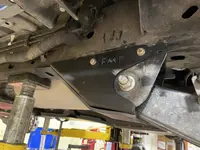
Here’s a picture with the skid on as a test fit and how the modified tongue now lies next to the RCI slider frame bracket. I’m considering welding the two parts together, but Foutz assured me this is unnecessary as their normal installation does not bolt the drivers side tongue to the frame (there is no existing hole to do say anyway).

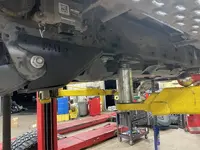
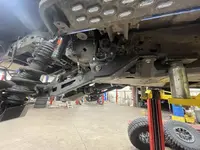
here’s a fully installed side shot

The Foutz skids arrived well packaged in perfect condition, stout like all their products and included all the necessary hardware. Note: it was impossible to tell if I received the necessary hardware as there was no packing list, no mention or pictures of the parts in the instructions and the instructions were incorrect and indicated many more parts were required or optional than were received. I think these were Bronco instructions labeled as Raptor instructions. However, they are supposed to update to the correct instructions today on their web site.
The Foutz skids have a “tongue“ that lays along the frame at the front of the skid. Unfortunately, my RCI frame mounted sliders have a bracket that lays partway across the bottom of the frame on the drivers side where the Foutz Skid tongue needs to mount. Fortunately, there is enough space for them to lay next to each other if you remove about a third of the width of the tongue. I figured that they should lay flat next to each other as the drivers side skid tongue does not bolt down.
Laying the tongue on top of the slider bracket won’t work as the mounting holes on the skid won’t line up with the frame bracket holes.
After test fitting and measuring (three times) I used some blue tape to mark the area to be removed. Using a hand grinder with cut-off wheel, I made two cuts to remove the taped area. As expected, I needed to remove a little more metal on the leading edge cut, so I used a grinding wheel next to remove a little more material and chamfer the edge. I did a test fit or two to arrive at the right amount of material to remove. All in all, not a difficult modification. Just took couple hours with painting.
Ultimately, the drivers side skid bolted in easily. The passenger side is sadly still a work in progress. More on that in Part 2!
The first picture shows the area to be removed covered in blue tape on each skid (NOTE: the passenger side skid does not need to be modified for the RCI slider. the passenger side RCI covers the entire frame width, and the Foutz skid can lay on top of the RCI and under the OEM tank skid. Then the tank skid bolt sandwiches all of this together).
It also shows the correct hardware pack and nut plates.
This shows the two cuts I made with a hand grinder and cut-off wheel.
This shows the amount I ground off the leading edge, it’s angled to achieve the fit, but not dig into the HDPE. I filed, primed and painted the exposed edges prior to installing.
Here’s a picture with the skid on as a test fit and how the modified tongue now lies next to the RCI slider frame bracket. I’m considering welding the two parts together, but Foutz assured me this is unnecessary as their normal installation does not bolt the drivers side tongue to the frame (there is no existing hole to do say anyway).
here’s a fully installed side shot
Last edited: