- Joined
- May 25, 2022
- Messages
- 608
- Gallery
- 295
- Reaction score
- 1,510
- Location
- Sacramento/Tahoe
- Current Ride
- 2022 Bronco Raptor
- Current Ride #2
- 2023 Land Rover Defender 110
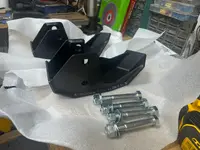
Ordered a set of shock skids about 5 weeks ago from Foutz Motorsports. Was told at the time it’d be a couple weeks before they shipped. So they were just a little longer than indicated, not an issue.
Skids arrived quickly once shipped and they were well packed, all hardware was present and quite stout as to be expected.
The installation instructions were pretty straightforward, there’s actually only two bolts to remove, slip on the skids and replace with two new bolts (provided).
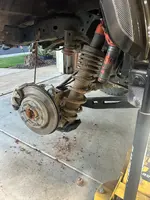
the process requires you to jack up the rear of the truck (if you don't have a lift, I don’t) and remove the wheels. After chocking and setting jack stands of course. After that, remove the two shock bracket bolts (the OEM bolts are linked together). Of course there’s a lot of weight on those bolts so it takes a little finagling with the floor jack on the axle to work them loose without damaging. Takes a little patience but it was Easy enough.
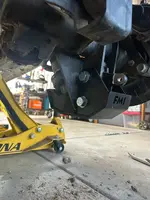
Then you slip the skid over the bracket. That didn’t work on one side (the bracket made of double width 3/16” plates was about 1mm narrower than the bracket it was supposed to slip over), so I ended up putting everything back together (getting that double bolt assembly back in was a little time consuming) and called Foutz. They basically told me to lever the thing on with a pry bar use some “persuasion“ or I could return it.
Easy to say to lever it on, but working under a car by yourself trying to hold a somewhat heavy skid plate up and use a pry bar to try to ”slide” it in was never going to work. So after noodling on it for awhile I decided to cut a wedge from some Brazilian hardwood I have. I pounded that baby in with a vengeance and got it to deflect from 64mm opening to 73mm, then sprung back to 65.25mm. Turns out this is the perfect width to slip on, but also tight enough to stay in place once it’s positioned! This is important as you’re trying to align three bracket holes on each side that have large parts (shock and axle) moving around. Having that stay in position removed a lot of complexity in inserting the new bolts.
So if your test fit won’t work or is too tight, I’d just make a wedge with a very steep angle and give it some limited “encouragement“ checking with a dial caliper that you’re not taking it too far.
The floor jack was also critical to raise/lower the axle so it would align with the shock bracket. Finally a round bar or large screwdriver to fully align the three brackets was handy. Oh and I used some wood to lever things a bit too. most wood I’ve used on a car repair.
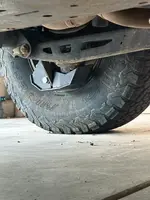
I don’t want this to sound overly hard, it really wasn’t. I was just a little put off by the poor initial fit, but after figuring that out with the wedge, it was just a matter of slowly working things into place to get the bolts out and new bolts in. But once on it fits great and looks like it will work great too. Quite pleased.
Next up is ordering Foutz Rear Lower Arm Bracket skids, IF I can clarify whether they’ll work with RCI Frame mount sliders as each of their brackets share some space along the frame. I think the passenger side with the gas tank skid is going to tuck in fine, but the drivers side may cause an issue as it appears the front of the skid bracket is not secured on that side. We’ll see.
the “gravy boat“

The difference in openings on two brackets

install photos


Skids arrived quickly once shipped and they were well packed, all hardware was present and quite stout as to be expected.
The installation instructions were pretty straightforward, there’s actually only two bolts to remove, slip on the skids and replace with two new bolts (provided).
the process requires you to jack up the rear of the truck (if you don't have a lift, I don’t) and remove the wheels. After chocking and setting jack stands of course. After that, remove the two shock bracket bolts (the OEM bolts are linked together). Of course there’s a lot of weight on those bolts so it takes a little finagling with the floor jack on the axle to work them loose without damaging. Takes a little patience but it was Easy enough.
Then you slip the skid over the bracket. That didn’t work on one side (the bracket made of double width 3/16” plates was about 1mm narrower than the bracket it was supposed to slip over), so I ended up putting everything back together (getting that double bolt assembly back in was a little time consuming) and called Foutz. They basically told me to lever the thing on with a pry bar use some “persuasion“ or I could return it.
Easy to say to lever it on, but working under a car by yourself trying to hold a somewhat heavy skid plate up and use a pry bar to try to ”slide” it in was never going to work. So after noodling on it for awhile I decided to cut a wedge from some Brazilian hardwood I have. I pounded that baby in with a vengeance and got it to deflect from 64mm opening to 73mm, then sprung back to 65.25mm. Turns out this is the perfect width to slip on, but also tight enough to stay in place once it’s positioned! This is important as you’re trying to align three bracket holes on each side that have large parts (shock and axle) moving around. Having that stay in position removed a lot of complexity in inserting the new bolts.
So if your test fit won’t work or is too tight, I’d just make a wedge with a very steep angle and give it some limited “encouragement“ checking with a dial caliper that you’re not taking it too far.
The floor jack was also critical to raise/lower the axle so it would align with the shock bracket. Finally a round bar or large screwdriver to fully align the three brackets was handy. Oh and I used some wood to lever things a bit too. most wood I’ve used on a car repair.
I don’t want this to sound overly hard, it really wasn’t. I was just a little put off by the poor initial fit, but after figuring that out with the wedge, it was just a matter of slowly working things into place to get the bolts out and new bolts in. But once on it fits great and looks like it will work great too. Quite pleased.
Next up is ordering Foutz Rear Lower Arm Bracket skids, IF I can clarify whether they’ll work with RCI Frame mount sliders as each of their brackets share some space along the frame. I think the passenger side with the gas tank skid is going to tuck in fine, but the drivers side may cause an issue as it appears the front of the skid bracket is not secured on that side. We’ll see.
the “gravy boat“
The difference in openings on two brackets
install photos
")