Jtops Bimini for Raptor

Obiwan

Member
Mar 4, 2023
32
Gallery
24
36
Southwest
Current Ride
Raptor
Hey everyone,

I have another thread going about the Jtops Bimini for Raptor on another forum. The one that smothers you with advertisements...

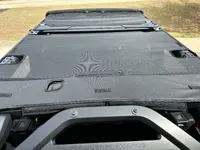
In short there was an update today from JTops owner which said:

"About to hatch!
It does not have to be removed and can be use in three configurations!"

49822889-769F-4BBE-86F9-85457D7F6184.jpeg
 
I'm ready...for it.

Took the front 2 rows of tops off this weekend to run around town but didn't feel like taking the rear off as I knew it was going to storm for a couple of days. Was just fine without a mesh but then again it was 60-70 deg and some sun. Once May/June arrives it will be a requirement to have some sort of shade around here when the top if off...and it will be off as much as possible.
 
"Here is a pic of the Raptor version from the manufacturing floor!
New rugged vinyl strip covers the c-pillar.
Avai'lable to order on March 19th.
Mike

9D0118AC-4721-43AD-A39A-A46D8A24970B.jpeg
Only one more day! I can't wait to see it fitted up to a Bronco Raptor.
 
I believe Mike said they would be available tomorrow. I think he thought the 19th was a Monday.
 
I just received my shipment notification...expected delivery Friday. If the weather holds then I'm hoping to get the hardtop off and the JTops installed Saturday. Not my next project though:

1680647759535.png
 
I just received my shipment notification...expected delivery Friday. If the weather holds then I'm hoping to get the hardtop off and the JTops installed Saturday. Not my next project though:

View attachment 7289
Received my bimini last Sunday, but I’m waiting to get help to take the top off after I return from DV/Mojave.

Weather will be perfect for the Bimini down there, but I decided I’d pass on collecting 300 miles of desert sediment and being windblown going back and forth 7 hours each way. Weather will be perfect when I get back and I won’t have as big of an interior cleanup to do.

I look forward to seeing yours soon!
 
Finished install today. Getting top on and off takes the most time. The shade install was very simple.

A few lessons.

Crossbrace on B Pillar comes completely off and is put back on top of the shade. Clips in the back go around the rear Raptor brace (pic of blue is done correctly…you can see in pic of mine that I initially didn’t loop those correctly).
When applying the velcro to the body, angle the velcro in the back down so it matches how the shade follows the rear pillars angling down.

Once roof goes back on the very front of the shade sags more than I’d like in the cabin bc it’s folded back to allow for access to the front top latches. Can probably solve with a few strategic pieces of velcro. Haven’t had it on the road yet to test noise and any flapping but will report back when I do.
16BC7AFC-2F8B-4912-865B-B1FF2BF9AE41.jpeg
 

Attachments

  • 8C486EE8-A05A-478E-B0E2-A1F61DAF48B8.jpeg
    8C486EE8-A05A-478E-B0E2-A1F61DAF48B8.jpeg
    457.9 KB · Views: 57
  • 307A4AC6-2721-4E9C-B423-7AD3D93CAB28.jpeg
    307A4AC6-2721-4E9C-B423-7AD3D93CAB28.jpeg
    319.2 KB · Views: 59
Finished install today. Getting top on and off takes the most time. The shade install was very simple.

A few lessons.

Crossbrace on B Pillar comes completely off and is put back on top of the shade. Clips in the back go around the rear Raptor brace (pic of blue is done correctly…you can see in pic of mine that I initially didn’t loop those correctly).
When applying the velcro to the body, angle the velcro in the back down so it matches how the shade follows the rear pillars angling down.

Once roof goes back on the very front of the shade sags more than I’d like in the cabin bc it’s folded back to allow for access to the front top latches. Can probably solve with a few strategic pieces of velcro. Haven’t had it on the road yet to test noise and any flapping but will report back when I do. View attachment 7315
Thanks for tips. My is scheduled to get here Monday. Let us know how the road test goes
 
Finished install today. Getting top on and off takes the most time. The shade install was very simple.

A few lessons.

Crossbrace on B Pillar comes completely off and is put back on top of the shade. Clips in the back go around the rear Raptor brace (pic of blue is done correctly…you can see in pic of mine that I initially didn’t loop those correctly).
When applying the velcro to the body, angle the velcro in the back down so it matches how the shade follows the rear pillars angling down.

Once roof goes back on the very front of the shade sags more than I’d like in the cabin bc it’s folded back to allow for access to the front top latches. Can probably solve with a few strategic pieces of velcro. Haven’t had it on the road yet to test noise and any flapping but will report back when I do. View attachment 7315

looking forward to getting it on tomorrow morning before I start my weekend runs. No Sun really expected in Dallas this weekend but it will help keep the chilly wind out of the cabin. Unless I see rain forecasted the top will remain in the corner of the garage through August.
 
Job Done this morning. Easy as pie but took a little adjusting after a couple of drives. Here’s how I approached it:

  • Rolled it out from back to front under the B-Pillar Braptor bar
  • Attached all 4 hooks on the front end
    • 2 go into the holes of the windshield brackets for the Front Row Roof Panels
    • 2 go the holes on the outside of the front row roll bars (above the windows)
  • Removed the 3 B-Pillar Braptor Bar bolts from the passenger side
  • Loosened the 3 bolts bolts from the drivers side
  • Slid the top under the passenger Bar and installed/tightened those 3 bolts back
  • Removed the 3 bolts from Drivers side; slid the top under the bar and installed/tightened those 3 bolts back
  • Pulled/Attached the Driver/Front velcro then went to other side to do the Passenger/Front. Did this to try to maintain Driver/Passenger alignment of the mesh top
  • Repeated for 2nd Row velcro
  • Looped the rear straps around the C-Pillar and Rear Braptor Bars; tightened as mush as possible
  • Thoroughly went across all Velcro sections to gain full attachment. Used Thumb/Palm to press as much as possible.

Initial findings:
  • I should have installed the velcro further down the rear roll bar as the top Velcro is probably only overlapping about 50% at the rear.
  • The rear straps need to be tighter than you think. I noticed the 2 rear bars (are they magnets) that go over the C-Pillar bars were kind of cock-eyed and not laying horizontal. After a couple of errands I came back and tightened those straps further and now sitting better.
  • Some flapping from under the B-Pillar Braptor bar due to wind. I think it improved after tightening the rear straps later. Not bad, just noticed it pretty quickly.
  • Really kept the chilly breeze to a minimum this morning so made it more comfortable (esp for the wife) driving around in 55ish deg weather.
  • Really good job of managing the sunlight.
I’m headed out for some highway time tomorrow so will see what it’s like at speed. But overall much tighter fitment than the JTops I had on the JLU.

In all I‘m so freaking happy to get this on with Spring/Summer hitting in Texas. The hardtop will only be installed through Sept if I see rain coming and I just have to be out and about.

IMG_4514.jpeg

IMG_4519.jpeg


IMG_4517.jpeg
 
Back
Top