Ape Factory
Well-known member
- Joined
- Jan 21, 2025
- Messages
- 199
- Gallery
- 126
- Reaction score
- 298
- Location
- San Antonio
- Current Ride
- Bronco Raptor
(Work in progress as I get all the mods and info up)
I'll start right off by saying that this may be the least "sexy" build ever chronicled. No big turbos or tuning, no real engine or transmission mods to speak of and probably not even an exhaust or intake. Instead, this'll be a practical list of items I've aded to my 2023 Bronco Raptor that aren't going to cause major issues with the original or extended warranty on the vehicle.
Most of the mods are for convenience and functionality with an eye on value as opposed to throwing large wads of cash at it. And know this is really, really hard as I'm a modaholic. I mean I have it bad. But I'm trying and occasionally I may indulge a bit.
First, meet Larry. Larry is a 2023 Cactus Gray I picked up used with 13K miles from my local Ford dealer. I literally stumbled on Larry just after being traded in and before being cleaned up and presented for sale. I purchased Larry on 12/31/24 with a Ford Blue certification despite having a mold in top that had one crack and not having the rear window glass recall done. And Larry came with an aftermarket blowoff valve, Rockslide Engineering Step Sliders and a number of smaller convenience mods throughout. I admittedly scored despite the crack in the MIC and I went in eyes wide open.
Larry, relatively stock and Jolene, left, not so much.

My first mod was black lugs and locks. I didn't go super expensive and just went with a high strength steel lugs. Make sure they're 14mm x 1.50 RH thread. Purchased mine here: https://www.cjponyparts.com/acorn-lug-nut-kit-bronco-raptor/p/WHLLN135/ along with the Ford Performance locking lugs: https://www.cjponyparts.com/ford-pe...l-lug-nuts-set-of-5-bronco-raptor/p/M1A043A5/. The finish, thus far, seems to be holding up just fine. We'll see after a few tire rotations.

Next on the list, I started looking at the stereo and speakers. I decided to do the three dash speakers as well as the rear pods. For the rears, I wanted to upgrade them to a 6.5" coax. As a musician, I always prefer my amp and my drummer behind me. Never liked stage monitors so I wanted more oomph from the rear. My speaker choice were Hertz Cento CX series which are reasonably affordable and had good reviews from those who've installed them in the past.
I would encourage you to shop around for these as they can sometimes be found for a good bit less on eBay or occasionally Amazon. Places like Crutchfield will be a good bit more expensive.
For the front three speakers, it's the Hertz Cento CX100: https://hertz-audio.com/product/cx-100/
For the rear pod speakers, it's the Hertz Cento CX165 coax: https://hertz-audio.com/product/cx-165/
In addition to the front speakers, you'll also need three Metro 72-5603 speaker harnesses for the three front speakers: https://www.amazon.com/dp/B0BQT36MN7?ref=ppx_yo2ov_dt_b_fed_asin_title
For the rears, you'll need two items to get the 6.5" speakers to work. First, you'll need new pods. You'll be tempted to buy the Mabett's off of Amazon but don't as they do not fit the BRaptor. Instead you'll need the MTI 3-D printed speaker pods for the Bronco Raptor found here: https://www.mtiacoustics.net/ford.html#!/2021-Ford-Bronco-Rear-Speaker-Pods/p/441935695
Know these are made to order so they generally ship out in a week or two. Just don't expect them the next day. They're pricey but it's also the only option.
In addition to the new pods, you'll need Metra 72-6514 speaker harnesses which make installation plug and play, no wire cutting. Link: https://www.amazon.com/dp/B0007WTEVM?ref_=pe_125775000_1044873430_t_fed_asin_title&th=1
The tweeters rotate on all of them so you're able to adjust their aim. The CX100's fit under the Braptor's speaker covers just fine. There are enough installation videos and write-ups so I'm not going to duplicate them here but the dash speakers are fairly straightforward and easy.
The rears, with the pods, almost necessitate removing the cargo area top. I take that back, it's mandatory if you want to stay sane. The pilot holes aren't drilled in the right place so it's impossible to get the screws in.
They come in a bed liner-like coating that's fairly rough and sturdy. I'm not super fond of the finish but it isn't the worst. I'm sure it's quite durable but it's not as if those pods are going to be taking hits given their location.
For the mounting process, I stared with the bottom, long bolt and then swung the pods upwards, reconnecting the wires in the process.
I then went to install the two shorter screws up top and could not, for the life of me, get them started. I then tried the included small screws and those wouldn't work either. I even removed the speaker and tried going in from the inside of the pod. But due to the holes not aligning, it was a no go. Seriously frustrating given the cost.
So if you're planning on installing these, it's top off or not at all. Just a heads up.


Not all grille covers will fit with the MTI pods. The Hertz covers did. They do NOT come with the 6.5" speakers and need to be purchased separately. Bezos link: https://www.amazon.com/dp/B07XLJ3SY2?ref=ppx_yo2ov_dt_b_fed_asin_title
With the top off, it's super easy. Drill new pilot holes and screw everything into place.


I found the easiest way to install these is (obviously roof off) is to start with the bottom bolt, rotate the pod so it's facing almost down. This gives you a bit more room to get an extension with the Torx bit in to tighten the bolt. Rotate it up and use the OEM screws with a power drill/philips bit. Push up on the pod while you press down on the bolt/drill. Screw it in slowly so it'll form a good groove and the threads will get a good purchase and keep you from stripping it.
Another issue I have with them is the opening to run the wires through. It's in the wrong spot. Theoretically, one could lengthen the OEM harness adapters but why would any one really want to do that? As is, the opening doesn't give enough length to stash the plug out of eyesight with the top off. Yet there's a large gap on the other side where it would have stowed nicely if the access hole had been in a different location.
Pics installed...


I will say they provided a lot more oomph and low end. Most will tell you the dash speakers make the largest improvement and I agree but closely followed by the rear pods. Given the cost, it is, IMO, a worthwhile upgrade. And at the time I was thinking of going with the Mobridge amp/dsp but more on that later.
Truth be told, there were a number of other mods I did before the speakers but I'm going to continue with the sound system for continuity. After upgrading the three dash and rear pod speakers, I decided to do the kick panel speakers with the same Cento CX165's found in the rear pods. Most simply go with a woofer and not a coax and that is not a bad option. I noticed very little difference with this upgrade but again, I was working towards the Mobridge which I knew would take advantage of the coax in the kick panel location.
With that said, you'll need adapter rings to install the Cento CX165 speakers and I'd imagine, most other 6.5" speakers. I started out with the Metra 82-5605 adapters. These require cutting off the tabs that poke inward. Unfortunately, with the coax speakers, the tweeter is too tall and you're unable to use the stock Bronco speaker grille.
The solution is the Sounds Good Stereo speaker adapters which aren't as tall and provide a perfect fit. Link: https://soundsgoodstereo.com/produc...w-request&utm_medium=email&utm_source=judgeme
The height difference is just enough that it fits.


If you want to use the Hertz Cento C 165L woofer, 6.5", you can probably get away with the Manet adapter. https://hertz-audio.com/product/c-165-l/
I do have the 8" Hertz Cento CS200 S4 subwoofer but I haven't installed it yet.
Now I know what you're thinking. There's a photo of your Bronco with the top off so you must have skipped a mod. I did. I actually had to wait for and install a roof hoist before I could install the pods. Unfortunately I have 16ft. ceilings in my garage, I'm afraid of heights and I'm recovering from a bi-lateral shoulder injury (both shoulders!).
None the less, I managed to screw in a few 2x6x8's into the ceiling after spending way too much time on a tall ladder (for me). I used this kit which is fairly affordable and I can one-hand raise/lower the rear portion of the top while using my other hand to guide it onto the bronco. Super easy and I didn't have to try to hold a 30 pound motor up against the ceiling while trying to secure it to the studs.
I used the front camera and the dotted side lines on the screen to run the Bronco parallel with the wall and then measured. This allowed me to place the boards in just the right spot on the ceiling and it makes driving the Bronco into the garage, properly aligned, a breeze. I dropped the lines in the appropriate location and overall it wasn't difficult to install. At this point, I was convinced the Bronco was becoming a lifestyle choice.

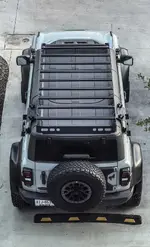
I know most back the bronco in and have the hoist forward of where the garage door stops. Because of my ceiling height, I chose to do it pulling forward. The process for getting the tools and straps out of the back necessitates doing so with the garage door open, then closing it for top removal. I only need to get it as high as the vertical tracks but it'll go much higher. In the end, it turned out to be a fortuitous choice due to me wanting a roof rack and clearance issues. More on that later.
Originally I bought larger, heavy duty straps to lift the roof but they proved to be too long. I went back to the included straps which are adjustable and have a buckle to release the strap ends. They're proving to be just fine. To further facilitate ease of hookup/removal, I use carabiners on the end so it's a simple clip and go affair.

Next up was the Alien Sunshade. I did quite a bit of research before settling. What drew me in was the ease of installation, ability to remove and install the top, the fact it worked with the Braptor and no velcro/glue to melt in the hot Texas sun. After using it for most of the spring, I'm very happy with the purchase. Yes, there's a gap in between the top of the windshield and the start of the mesh but it stays put, is pretty much noise free and does everything I need it to do. And it's half the price of the more expensive brand that uses velcro. I don't have a lot of great photos but with no mods, it works with the Raptor's cross bar. Purchased off of Amazon here: https://www.amazon.com/dp/B0CKJ81D1D?ref_=pe_125775000_1044873430_fed_asin_title


I added a lot of little convenience/commuting mods along with stuff to keep the interior in good shape and protected from my dogs. Amazon gets the nod on most of this stuff.
I have one that likes to "surf" with the top off and stand on the center console. I strap him in with a harness/metal leash so he's safe. So a center console protector was a no-brainer.

The back of the rear seats would need protecting too so I purchased a set made by Maxzina which I believe were the least expensive I could find at the time and they 100% work as designed.


Comes in a three piece set and they simply stick on with velcro.
I did buy a screen protector. No photo because it's clear. This one came as a two pack and again, wasn't the most expensive one out there and zero complaints. Screen works like it should.
I'll start right off by saying that this may be the least "sexy" build ever chronicled. No big turbos or tuning, no real engine or transmission mods to speak of and probably not even an exhaust or intake. Instead, this'll be a practical list of items I've aded to my 2023 Bronco Raptor that aren't going to cause major issues with the original or extended warranty on the vehicle.
Most of the mods are for convenience and functionality with an eye on value as opposed to throwing large wads of cash at it. And know this is really, really hard as I'm a modaholic. I mean I have it bad. But I'm trying and occasionally I may indulge a bit.
First, meet Larry. Larry is a 2023 Cactus Gray I picked up used with 13K miles from my local Ford dealer. I literally stumbled on Larry just after being traded in and before being cleaned up and presented for sale. I purchased Larry on 12/31/24 with a Ford Blue certification despite having a mold in top that had one crack and not having the rear window glass recall done. And Larry came with an aftermarket blowoff valve, Rockslide Engineering Step Sliders and a number of smaller convenience mods throughout. I admittedly scored despite the crack in the MIC and I went in eyes wide open.
Larry, relatively stock and Jolene, left, not so much.
My first mod was black lugs and locks. I didn't go super expensive and just went with a high strength steel lugs. Make sure they're 14mm x 1.50 RH thread. Purchased mine here: https://www.cjponyparts.com/acorn-lug-nut-kit-bronco-raptor/p/WHLLN135/ along with the Ford Performance locking lugs: https://www.cjponyparts.com/ford-pe...l-lug-nuts-set-of-5-bronco-raptor/p/M1A043A5/. The finish, thus far, seems to be holding up just fine. We'll see after a few tire rotations.
Next on the list, I started looking at the stereo and speakers. I decided to do the three dash speakers as well as the rear pods. For the rears, I wanted to upgrade them to a 6.5" coax. As a musician, I always prefer my amp and my drummer behind me. Never liked stage monitors so I wanted more oomph from the rear. My speaker choice were Hertz Cento CX series which are reasonably affordable and had good reviews from those who've installed them in the past.
I would encourage you to shop around for these as they can sometimes be found for a good bit less on eBay or occasionally Amazon. Places like Crutchfield will be a good bit more expensive.
For the front three speakers, it's the Hertz Cento CX100: https://hertz-audio.com/product/cx-100/
For the rear pod speakers, it's the Hertz Cento CX165 coax: https://hertz-audio.com/product/cx-165/
In addition to the front speakers, you'll also need three Metro 72-5603 speaker harnesses for the three front speakers: https://www.amazon.com/dp/B0BQT36MN7?ref=ppx_yo2ov_dt_b_fed_asin_title
For the rears, you'll need two items to get the 6.5" speakers to work. First, you'll need new pods. You'll be tempted to buy the Mabett's off of Amazon but don't as they do not fit the BRaptor. Instead you'll need the MTI 3-D printed speaker pods for the Bronco Raptor found here: https://www.mtiacoustics.net/ford.html#!/2021-Ford-Bronco-Rear-Speaker-Pods/p/441935695
Know these are made to order so they generally ship out in a week or two. Just don't expect them the next day. They're pricey but it's also the only option.
In addition to the new pods, you'll need Metra 72-6514 speaker harnesses which make installation plug and play, no wire cutting. Link: https://www.amazon.com/dp/B0007WTEVM?ref_=pe_125775000_1044873430_t_fed_asin_title&th=1
The tweeters rotate on all of them so you're able to adjust their aim. The CX100's fit under the Braptor's speaker covers just fine. There are enough installation videos and write-ups so I'm not going to duplicate them here but the dash speakers are fairly straightforward and easy.
The rears, with the pods, almost necessitate removing the cargo area top. I take that back, it's mandatory if you want to stay sane. The pilot holes aren't drilled in the right place so it's impossible to get the screws in.
They come in a bed liner-like coating that's fairly rough and sturdy. I'm not super fond of the finish but it isn't the worst. I'm sure it's quite durable but it's not as if those pods are going to be taking hits given their location.
For the mounting process, I stared with the bottom, long bolt and then swung the pods upwards, reconnecting the wires in the process.
I then went to install the two shorter screws up top and could not, for the life of me, get them started. I then tried the included small screws and those wouldn't work either. I even removed the speaker and tried going in from the inside of the pod. But due to the holes not aligning, it was a no go. Seriously frustrating given the cost.
So if you're planning on installing these, it's top off or not at all. Just a heads up.
Not all grille covers will fit with the MTI pods. The Hertz covers did. They do NOT come with the 6.5" speakers and need to be purchased separately. Bezos link: https://www.amazon.com/dp/B07XLJ3SY2?ref=ppx_yo2ov_dt_b_fed_asin_title
With the top off, it's super easy. Drill new pilot holes and screw everything into place.
I found the easiest way to install these is (obviously roof off) is to start with the bottom bolt, rotate the pod so it's facing almost down. This gives you a bit more room to get an extension with the Torx bit in to tighten the bolt. Rotate it up and use the OEM screws with a power drill/philips bit. Push up on the pod while you press down on the bolt/drill. Screw it in slowly so it'll form a good groove and the threads will get a good purchase and keep you from stripping it.
Another issue I have with them is the opening to run the wires through. It's in the wrong spot. Theoretically, one could lengthen the OEM harness adapters but why would any one really want to do that? As is, the opening doesn't give enough length to stash the plug out of eyesight with the top off. Yet there's a large gap on the other side where it would have stowed nicely if the access hole had been in a different location.
Pics installed...
I will say they provided a lot more oomph and low end. Most will tell you the dash speakers make the largest improvement and I agree but closely followed by the rear pods. Given the cost, it is, IMO, a worthwhile upgrade. And at the time I was thinking of going with the Mobridge amp/dsp but more on that later.
Truth be told, there were a number of other mods I did before the speakers but I'm going to continue with the sound system for continuity. After upgrading the three dash and rear pod speakers, I decided to do the kick panel speakers with the same Cento CX165's found in the rear pods. Most simply go with a woofer and not a coax and that is not a bad option. I noticed very little difference with this upgrade but again, I was working towards the Mobridge which I knew would take advantage of the coax in the kick panel location.
With that said, you'll need adapter rings to install the Cento CX165 speakers and I'd imagine, most other 6.5" speakers. I started out with the Metra 82-5605 adapters. These require cutting off the tabs that poke inward. Unfortunately, with the coax speakers, the tweeter is too tall and you're unable to use the stock Bronco speaker grille.
The solution is the Sounds Good Stereo speaker adapters which aren't as tall and provide a perfect fit. Link: https://soundsgoodstereo.com/produc...w-request&utm_medium=email&utm_source=judgeme
The height difference is just enough that it fits.
If you want to use the Hertz Cento C 165L woofer, 6.5", you can probably get away with the Manet adapter. https://hertz-audio.com/product/c-165-l/
I do have the 8" Hertz Cento CS200 S4 subwoofer but I haven't installed it yet.
Now I know what you're thinking. There's a photo of your Bronco with the top off so you must have skipped a mod. I did. I actually had to wait for and install a roof hoist before I could install the pods. Unfortunately I have 16ft. ceilings in my garage, I'm afraid of heights and I'm recovering from a bi-lateral shoulder injury (both shoulders!).
None the less, I managed to screw in a few 2x6x8's into the ceiling after spending way too much time on a tall ladder (for me). I used this kit which is fairly affordable and I can one-hand raise/lower the rear portion of the top while using my other hand to guide it onto the bronco. Super easy and I didn't have to try to hold a 30 pound motor up against the ceiling while trying to secure it to the studs.
I used the front camera and the dotted side lines on the screen to run the Bronco parallel with the wall and then measured. This allowed me to place the boards in just the right spot on the ceiling and it makes driving the Bronco into the garage, properly aligned, a breeze. I dropped the lines in the appropriate location and overall it wasn't difficult to install. At this point, I was convinced the Bronco was becoming a lifestyle choice.
I know most back the bronco in and have the hoist forward of where the garage door stops. Because of my ceiling height, I chose to do it pulling forward. The process for getting the tools and straps out of the back necessitates doing so with the garage door open, then closing it for top removal. I only need to get it as high as the vertical tracks but it'll go much higher. In the end, it turned out to be a fortuitous choice due to me wanting a roof rack and clearance issues. More on that later.
Originally I bought larger, heavy duty straps to lift the roof but they proved to be too long. I went back to the included straps which are adjustable and have a buckle to release the strap ends. They're proving to be just fine. To further facilitate ease of hookup/removal, I use carabiners on the end so it's a simple clip and go affair.
Next up was the Alien Sunshade. I did quite a bit of research before settling. What drew me in was the ease of installation, ability to remove and install the top, the fact it worked with the Braptor and no velcro/glue to melt in the hot Texas sun. After using it for most of the spring, I'm very happy with the purchase. Yes, there's a gap in between the top of the windshield and the start of the mesh but it stays put, is pretty much noise free and does everything I need it to do. And it's half the price of the more expensive brand that uses velcro. I don't have a lot of great photos but with no mods, it works with the Raptor's cross bar. Purchased off of Amazon here: https://www.amazon.com/dp/B0CKJ81D1D?ref_=pe_125775000_1044873430_fed_asin_title
I added a lot of little convenience/commuting mods along with stuff to keep the interior in good shape and protected from my dogs. Amazon gets the nod on most of this stuff.
I have one that likes to "surf" with the top off and stand on the center console. I strap him in with a harness/metal leash so he's safe. So a center console protector was a no-brainer.
The back of the rear seats would need protecting too so I purchased a set made by Maxzina which I believe were the least expensive I could find at the time and they 100% work as designed.
Comes in a three piece set and they simply stick on with velcro.
I did buy a screen protector. No photo because it's clear. This one came as a two pack and again, wasn't the most expensive one out there and zero complaints. Screen works like it should.
Last edited:
As an Amazon Associate we earn from qualifying purchases.


")