B&O Speaker Upgrade

TCopp

Well-known member
Founding Member
Feb 27, 2022
159
Gallery
82
269
KC
Current Ride
Raptor
First Responder
Paramedic
Hey all, I finally finished replacing all of my speakers. This was the first car audio system I have messed with, so, if I can do it, don’t be intimidated by it. The B/O system is advertised as a 10 speaker system, but there are only 8 total speakers. I am going to link the post I followed on Bronco6G, please read this and follow this, I will add more pics/info when it comes to install the subwoofer. I purchased everything on his list, also don’t forget some 14G speaker wire and an M6 or M4 nut to secure the inline fuse to the battery under the hood.

Link to Bronco6G Guide by Ksjrb03

F96A772F-BD84-4ED7-894E-7B68E2431B31.jpeg

CD49477B-36AC-4AAC-91AE-E75ED792C4E1.jpeg


I’ll start with the three dash speakers. Very easy. Buy a trim removal kit and pry the top speaker covers out. Ksj has linked all of the steps to remove the trim on his post, as well as the wiring diagrams. The middle speaker is a little tricky due to the screw and the charger connection at the top. I used a different sound deadener brand underneath the speakers (Noico).

FF941C9D-1D66-4547-BE9A-B9B1E51B0FBF.jpeg

The two kick panel speakers are a little more difficult just due to the space. Remove the grab handles, then the two door trim pieces. The driver side requires removal of the dead pedal. Underneath the dead pedal are two screws to unscrew. I only took a pic of the passenger side here because I wasn’t planning on doing a write up at first. Getting the screws to mount the speaker can be tricky up top, but overall relatively simple.

D4CF3A61-A09D-497A-AE07-10C14AACF964.jpeg

These two focal speakers were the easiest. Simply pop the covers off and wire these in. Pry off the two mounting tabs that are unused to make it fit.

64A053C8-937A-4F10-A682-C754C9D98C8F.jpeg

Ok, now on to the subwoofer build. I can only attach 10 images per post, so this will end up being multiple posts. Follow the guides and take out all of the rear. Definitely easier with the seats laid down. I did break two of those black/white fasteners. I’ll get some new ones some other time. This side has one wire connection you have to undo.
3A7DD636-87B7-4BA9-B6C4-B2F70E2428AC.jpeg

The subwoofer side has three wire connections to undo before completely pulling the panel off.
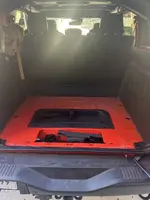
F9483369-03C5-4C03-AD56-AED74C896B77.jpeg

Floor panel out.
01DDD0FE-CAC9-4AA0-8D90-55A18B597602.jpeg

I did not have any rattling from the stock speakers. I have heard others do. Kcj went all out on dynamat. I did a single layer and covered most of the space.
67004D0B-E988-4829-A441-7D7A777A2E84.jpeg


Unclip the green wire connector going to the sub and the three connections into the amp, and unscrew the two screws and two nuts to completely free the sub enclosure from the vehicle.

Continued on next post.
 

Attachments

  • 50BFE2A9-0A92-4395-BBB8-BD8832A1159B.jpeg
    50BFE2A9-0A92-4395-BBB8-BD8832A1159B.jpeg
    130.7 KB · Views: 150
Last edited:
OP
TCopp

TCopp

Well-known member
Founding Member
Feb 27, 2022
159
Gallery
82
269
KC
Current Ride
Raptor
First Responder
Paramedic
  • Thread Starter
  • Thread starter
  • #2
AFA8A352-EF09-419C-80FD-08542610FAE9.jpeg
A5A8B2E4-944D-4DDB-8A1B-C92FC41C7E61.jpeg

So on Kcj’s build, this is where he mounts the Kicker amp. Well, that huge wire connection mounts right where you are to mount the amp. I am not sure if this connection is here on the other trim Broncos, but it is large and very in the way. I slid the amp in anyway and pushed the wires out of the way, marked two holes, and drilled.
3231672F-232E-4319-9606-A1E12B2AE946.jpeg

I then ran the bass controller speaker knob wire. Starting from the rear I ran it along with the other wires. When you get to the B pillar panel, just release the clips the best you can and fish the wire behind it. You will have to take the same panels off when installing the passenger kick panel. I ran it under the kick panel speaker, then up behind the glove box. I didn’t pull any of the center console panels, there’s enough of a gap to just push the wire up under it.
8A75E249-FCF7-4C69-B33D-F3BD2F94CF6B.jpeg

Here is the wire going to the center console. I just left it there for now.
66758F1F-B6C1-4300-8EA4-4C9B77BA0255.jpeg

Next up was running the 8G power wire. The driver side kick panel will need to be taken out for this. This hole here has a grommet with nothing going through it, so I took it out, sliced a hole, and ran enough cable to reach the battery.
C00E4EE3-E0E5-4F07-B254-7EE13F02681F.jpeg

Power cable running alongside the rest of the wiring.
7A92D299-4AA9-4349-BA6B-9F20314737D2.jpeg

Here is the wire going through the grommet.
AF882352-3280-4495-8CD1-D90E990681CB.jpeg

Power wire going to the back seat.
4040BC00-1C2D-4E83-A44F-28DA45014EBE.jpeg

This pic is out of order, but here is the stock subwoofer unscrewed and disconnected from the two wire connectors.
F7121CF7-95A6-4E13-93BE-BA9EDCC5220E.jpeg


Power line running along the other wire plume to the rear passenger side. I just used the white clips already there for the power wire to secure it.

Continued.
 
OP
TCopp

TCopp

Well-known member
Founding Member
Feb 27, 2022
159
Gallery
82
269
KC
Current Ride
Raptor
First Responder
Paramedic
  • Thread Starter
  • Thread starter
  • #3
CD9832BB-4DD3-4D54-BCB1-657C756888AC.jpeg

Ok, now to wire the sub. Using the 14G speaker wire, run a parallel circuit on the sub. Red to red to positive terminal on the kicker amp, black to black to negative terminal on the kicker amp. The four colored wires connected to the original sub were cut right outside of the grommet. I drilled a hold in the grommet here, just like Kcj did, and ran the new 14G speaker wire through it.
4AD864F1-F1EA-4B2A-ACE3-F0BC4DA2C6B4.jpeg

I didn’t take a good picture of the inline power fuse in it’s final mounting position (Kcj has one on his post). I would do this step last, after all the wiring is done. Connect the 8G power wire into the fuse, then screw down the eye to one of the open positive terminals on the battery. I mounted the large plastic fuse section to the side of the fuse box using double sided 3M tape.
D5FA414C-374E-409C-A076-7D726F9B8B03.jpeg

Here is where the 8G power wire plugs into, the +12V terminal. The extra 8G wire you have is used to ground the amp. Connect it here and run it to the ground that is right above where the sub enclosure sits.
AD5E08C6-C74C-439F-AD45-E603FF5330F0.jpeg

Here is the part where I had a lot of troubleshooting, connecting the high level inputs. The amp will come with a wire with red and white RCA connectors. Cut those off. Here is the correct wiring for the factory sub wires to the amp high level input wires. Solid white to yellow, White/black to purple, grey to green, and grey/black to black. I had these mixed up because I read the wiring diagram wrong and the sub was barely working. Luckily after much back and forth with Kcj, he found a paper where he wrote down how he wired it, and my sub worked like a charm right after. Also, I did change these into butt connectors.
4F30C242-1762-4D2D-B681-190E9A877A2A.jpeg

797CC430-3E90-475A-AD69-9A038142F79B.jpeg

Sub filled with poly. Also, there is that very small tab between the bottom two screw holes there. The old sub sits on the tab, if you can, cut it off. I didn’t notice this until I screwed the new sub in, which is slightly larger, so there is an open gap now (that I covered with the sound deadening).
73E8473B-0555-401F-9CA9-1B1C3A117E65.jpeg

Taking the plastic Kicker mounting ring off was a pain. I used a screwdriver to get just inside the backside of the ring, then hammered to release the glue, then just pried along the rest of the ring with the screwdriver. It’s mounted with glue, nothing else.
3B34B612-B7D6-4921-836D-1FFDBDAE0FC4.jpeg

I drilled four new pilot holes and used the original screws to mount the Kicker sub.

Ok, so now is when I officially mounted the amp. Do not forget to attach the 90 degree wire that connects into the front of the amp to the bass controller knob wire. With all of the wires connected to the back of the amp now, it caused a very very snug fit. The large black wire connection that was originally here that was taken out of the body, now sits in front of the amp, I did not know where else to put it. After I mocked this up, I lined the underside edges of the amp with 3M double sided tape, and stuck it in place, then screwed in the two screws. Then, place the subwoofer back where it mounts and screw it in place. Connect the green wire connector back together and the three connections back into the B/O amp. I tested and made sure everything worked before mounting everything. After this, just put all of the panels back on (kind of a pain).
8E5B0C3C-0ED4-4561-8976-7656E4C64EE5.jpeg

Here is the bass knob controller mounted underneath the center console area, I just used the double sided 3M tape.
E4CD912D-A823-4BA9-A846-C684EF309A5E.png

Lastly, this is a picture of Ksj’s amp and the settings he used. For this amp to work though, the dc offset button needs to be on (pushed in) and the input level button on high (pushed in). I did not set up the key function that is in the Kicker manual.

Honestly, having this sub made it feel like the stock system never had a sub. I consider myself a slight audiophile, and this setup is much better than the B/O. I also recommend using a bunch of electrical tape to secure and protect the wiring. I didn’t picture any of it in these pics. Feel free to ask me questions or reach out to Ksjrb03 on Bronco6G. He is really helpful.
 

TurboS

Moderator
Staff member
Founding Member
Feb 24, 2022
2,544
Gallery
730
3,563
Michigan
Current Ride
2022 Bronco Raptor
Wow is right, Well done and thank you for putting all this together with the detailed photo's! I can feel a B&O upgrade coming now for my BR!
 

Porque No

Member
Founding Member
Feb 24, 2022
56
Gallery
4
60
San Antonio, TX
View attachment 4063
Ok, now to wire the sub. Using the 14G speaker wire, run a parallel circuit on the sub. Red to red to positive terminal on the kicker amp, black to black to negative terminal on the kicker amp. The four colored wires connected to the original sub were cut right outside of the grommet. I drilled a hold in the grommet here, just like Kcj did, and ran the new 14G speaker wire through it.
View attachment 4064
I didn’t take a good picture of the inline power fuse in it’s final mounting position (Kcj has one on his post). I would do this step last, after all the wiring is done. Connect the 8G power wire into the fuse, then screw down the eye to one of the open positive terminals on the battery. I mounted the large plastic fuse section to the side of the fuse box using double sided 3M tape.
View attachment 4065
Here is where the 8G power wire plugs into, the +12V terminal. The extra 8G wire you have is used to ground the amp. Connect it here and run it to the ground that is right above where the sub enclosure sits.
View attachment 4066
Here is the part where I had a lot of troubleshooting, connecting the high level inputs. The amp will come with a wire with red and white RCA connectors. Cut those off. Here is the correct wiring for the factory sub wires to the amp high level input wires. Solid white to yellow, White/black to purple, grey to green, and grey/black to black. I had these mixed up because I read the wiring diagram wrong and the sub was barely working. Luckily after much back and forth with Kcj, he found a paper where he wrote down how he wired it, and my sub worked like a charm right after. Also, I did change these into butt connectors.
View attachment 4072
View attachment 4067
Sub filled with poly. Also, there is that very small tab between the bottom two screw holes there. The old sub sits on the tab, if you can, cut it off. I didn’t notice this until I screwed the new sub in, which is slightly larger, so there is an open gap now (that I covered with the sound deadening).
View attachment 4068
Taking the plastic Kicker mounting ring off was a pain. I used a screwdriver to get just inside the backside of the ring, then hammered to release the glue, then just pried along the rest of the ring with the screwdriver. It’s mounted with glue, nothing else.
View attachment 4069
I drilled four new pilot holes and used the original screws to mount the Kicker sub.

Ok, so now is when I officially mounted the amp. Do not forget to attach the 90 degree wire that connects into the front of the amp to the bass controller knob wire. With all of the wires connected to the back of the amp now, it caused a very very snug fit. The large black wire connection that was originally here that was taken out of the body, now sits in front of the amp, I did not know where else to put it. After I mocked this up, I lined the underside edges of the amp with 3M double sided tape, and stuck it in place, then screwed in the two screws. Then, place the subwoofer back where it mounts and screw it in place. Connect the green wire connector back together and the three connections back into the B/O amp. I tested and made sure everything worked before mounting everything. After this, just put all of the panels back on (kind of a pain).
View attachment 4070
Here is the bass knob controller mounted underneath the center console area, I just used the double sided 3M tape.
View attachment 4071
Lastly, this is a picture of Ksj’s amp and the settings he used. For this amp to work though, the dc offset button needs to be on (pushed in) and the input level button on high (pushed in). I did not set up the key function that is in the Kicker manual.

Honestly, having this sub made it feel like the stock system never had a sub. I consider myself a slight audiophile, and this setup is much better than the B/O. I also recommend using a bunch of electrical tape to secure and protect the wiring. I didn’t picture any of it in these pics. Feel free to ask me questions or reach out to Ksjrb03 on Bronco6G. He is really helpful.
Great work. I have to ask, where did you get your Raptor sill plates?
 

Ironmike

Well-known member
Founding Member
Feb 17, 2022
689
Gallery
29
755
California
Current Ride
2022 Bronco Raptor
Current Ride #2
2021 Rubicon JLU
Wow, y’all love your music! I’m not sure I’d appreciate the difference while I’m bombing across the Mojave….
 

TurboS

Moderator
Staff member
Founding Member
Feb 24, 2022
2,544
Gallery
730
3,563
Michigan
Current Ride
2022 Bronco Raptor
Wow, y’all love your music! I’m not sure I’d appreciate the difference while I’m bombing across the Mojave….
:giggle: Some of us aren't fortunate enough to have a Mojave, however if I did I agree with ya it would be Baja mode and hammer time. 🏁
 
OP
TCopp

TCopp

Well-known member
Founding Member
Feb 27, 2022
159
Gallery
82
269
KC
Current Ride
Raptor
First Responder
Paramedic
  • Thread Starter
  • Thread starter
  • #10
Gotta have something else to enjoy, haha. I wish there was more off-roading opportunities here in Kansas.
 

Dragoon

Administrator
Staff member
Founding Member
Sep 16, 2021
1,391
Gallery
313
1,560
FBG TX
Current Ride
2023 Bronco Raptor
Current Ride #2
2022 Ram TRX
Thank you for sharing this! This will be super helpful when I dive into my stereo system upgrade.
 

Dragoon

Administrator
Staff member
Founding Member
Sep 16, 2021
1,391
Gallery
313
1,560
FBG TX
Current Ride
2023 Bronco Raptor
Current Ride #2
2022 Ram TRX
The B&O stereo in my soft-top Bronco would disappear when I had the top down. I'm sure it's better in the hardtop models, but if you plan to have your top or doors off for a considerable amount of time then I think an upgrade is appropriate.
 

Motorcitysam

New member
Nov 21, 2022
6
Gallery
10
6
Metro Detroit
Current Ride
2022 Bronco Raptor
Current Ride #2
1998 Panoz Roadster AIV
How’s the panel rattle where the sub is? I know you soundproofed but just curious. I’ve been debating a 3 way setup up front, new rears in an upgraded pod but a new sub in the factory location because I don’t want to lose trunk space. Just want overall better sound and more bass.
 

Top Member Reactions

Top