- Joined
- May 25, 2022
- Messages
- 615
- Gallery
- 313
- Reaction score
- 1,517
- Location
- Sacramento/Tahoe
- Current Ride
- 2022 Bronco Raptor
- Current Ride #2
- 2023 Land Rover Defender 110
Demolition….
I've just completed my sixth week since ordering the Goose Gear Stealth Sleep and Storage package, and was itching to move forward. So....I pulled the rear seats today. Goal was to have the truck ready for install once I receive the kit and figure out a few things.... like how to best deal with seat belts and associated errors if I remove them, soundproofing or not, satisfying my curiosity about what's all under there, etc...
Overall, pulling the seats was pretty straightforward. It took me about 90 minutes including grabbing tools, reinstalling seat belt brackets and cleanup.
I thought I'd document this in the event that anyone else wants to reduce the number of people they may have to share the cabin with. I'll post other learnings and the installation summary here once I receive and install the kit.
Tools required:
1/2" drive ratchet (you'll need the leverage to loosen the 18mm nuts)
1/2" 6" extension (makes removing 18mms and T55 seatbelt bolts a little easier)
18mm deep well socket (for nuts at rear seat and center seat belt brackets)
13mm standard socket (for nuts and bolt on at front of seat)
18mm wrench (preferably ratcheting to remove on nut on the 2/3rds seat)
T55 bit (to remove seat belt brackets on outboard seat belts)
A small pry tool (to remove a locking washer)
push pin pry tool (to remove two push pins securing the cover over the dual seat bracket)
I removed the 1/3 seat first. I'm not sure if this is better than removing 2/3rd seat first. My theory was it would be easier to learn on the smaller lighter seat. I think I was right in this decision, the 2/3 seat was a little trickier to remove. I have MGV interior, not sure if there any Leather seat specific nuances.
I started by pulling the folding cover behind the seats. This removed easily by pulling firmly at each end to release the clips. This exposes the 18 nuts securing the rear of the seats.
Removed both 18mm nuts on the 1/3 seat. There is loctite on these, it takes a bit of leverage to remove all 18mm nuts.
Removed floor mats.
Pulled the covers over the brackets securing the front of the seat. These come out by lifting the back of the cover and then pulling forward. This exposes the 13mm nuts.
Removed both 13mm nuts
Now the seat will fold up or the seat back down. This allows easier access to the dual seat buckles hardware that is mounted on top of the seat brackets for both 1/3 and 2/3 seat.
Remove the bracket cover using the Push pin pry tool on the two push pins securing the cover then lift the cover out.
Remove the bolts cover by pulling straight up.
Remove the two 18mm nuts and pull the dual set buckle assembly out.
Remove the T55 bolt securing the seatbelt shoulder strap to the floor.
Remove the seat. Don't worry about any wiring harness, nothing connects from the seat assembly to the vehicle. The 1/3 seat weighs about 35 lbs and folds up nicely, so it was easy to pull off the bolts and slip out the door.
the steps are very similar for the 2/3 seat, except.
the single seatbelt buckle bracket nut has a lock washer that is securely fastened to the bolt after removing the nut. I used a small screwdriver to pry it loose and unscrewed it after that.
The 2/3 seat rear brackets had some spring tension that I had to deal with. In retrospect it may have been better to remove the rear 18mm nuts last.
The 2/3 seat is at least 50 percent bigger, it weighs 54 pounds and the aforementioned brackets make removing it and extracting it harder. I did it solo, but helping hands would hav3 made that easier.
I’m still figuring out what, if anything, I can remove related to the belts without getting constant seat belt errors. With seats out, but all seatbelt hardware installed and harnesses connected there are no errors (to be expected). I’ll post an update if I figure a better solution (less hardware, with no errors).
With hinged cover and rear 18mm nuts removed

Here is the dual seat buckle in place with cover and 18mm nuts removed

The 1/3 seat removed


Cover for front bracket

Front bracket. You can see where it clips in on the sides then has to slide forward to clear the front metal tab

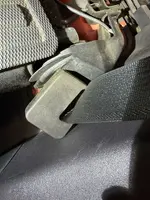
One of the shoulder belt T55 bracket bolts after removing the cover

You can see the lock washer that has to be pried open before spinning off

All the 2/3 seat covers and hardware. Not shown is the T55 bolt which was reinstalled.

The center dual buckle bracket covers and hardware. You can see the front of one push pin and the tip of the other on the cover here

1/3 seat hardware and cover. Not shown is the T55 bolt which was reinstalled.

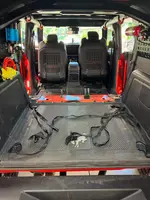
Here’s what’s under the seats on MGV interior. Not I replaced the bull buckle in the wrong place in this picture! It should be on the forward bolts.

I've just completed my sixth week since ordering the Goose Gear Stealth Sleep and Storage package, and was itching to move forward. So....I pulled the rear seats today. Goal was to have the truck ready for install once I receive the kit and figure out a few things.... like how to best deal with seat belts and associated errors if I remove them, soundproofing or not, satisfying my curiosity about what's all under there, etc...
Overall, pulling the seats was pretty straightforward. It took me about 90 minutes including grabbing tools, reinstalling seat belt brackets and cleanup.
I thought I'd document this in the event that anyone else wants to reduce the number of people they may have to share the cabin with. I'll post other learnings and the installation summary here once I receive and install the kit.
Tools required:
1/2" drive ratchet (you'll need the leverage to loosen the 18mm nuts)
1/2" 6" extension (makes removing 18mms and T55 seatbelt bolts a little easier)
18mm deep well socket (for nuts at rear seat and center seat belt brackets)
13mm standard socket (for nuts and bolt on at front of seat)
18mm wrench (preferably ratcheting to remove on nut on the 2/3rds seat)
T55 bit (to remove seat belt brackets on outboard seat belts)
A small pry tool (to remove a locking washer)
push pin pry tool (to remove two push pins securing the cover over the dual seat bracket)
I removed the 1/3 seat first. I'm not sure if this is better than removing 2/3rd seat first. My theory was it would be easier to learn on the smaller lighter seat. I think I was right in this decision, the 2/3 seat was a little trickier to remove. I have MGV interior, not sure if there any Leather seat specific nuances.
I started by pulling the folding cover behind the seats. This removed easily by pulling firmly at each end to release the clips. This exposes the 18 nuts securing the rear of the seats.
Removed both 18mm nuts on the 1/3 seat. There is loctite on these, it takes a bit of leverage to remove all 18mm nuts.
Removed floor mats.
Pulled the covers over the brackets securing the front of the seat. These come out by lifting the back of the cover and then pulling forward. This exposes the 13mm nuts.
Removed both 13mm nuts
Now the seat will fold up or the seat back down. This allows easier access to the dual seat buckles hardware that is mounted on top of the seat brackets for both 1/3 and 2/3 seat.
Remove the bracket cover using the Push pin pry tool on the two push pins securing the cover then lift the cover out.
Remove the bolts cover by pulling straight up.
Remove the two 18mm nuts and pull the dual set buckle assembly out.
Remove the T55 bolt securing the seatbelt shoulder strap to the floor.
Remove the seat. Don't worry about any wiring harness, nothing connects from the seat assembly to the vehicle. The 1/3 seat weighs about 35 lbs and folds up nicely, so it was easy to pull off the bolts and slip out the door.
the steps are very similar for the 2/3 seat, except.
the single seatbelt buckle bracket nut has a lock washer that is securely fastened to the bolt after removing the nut. I used a small screwdriver to pry it loose and unscrewed it after that.
The 2/3 seat rear brackets had some spring tension that I had to deal with. In retrospect it may have been better to remove the rear 18mm nuts last.
The 2/3 seat is at least 50 percent bigger, it weighs 54 pounds and the aforementioned brackets make removing it and extracting it harder. I did it solo, but helping hands would hav3 made that easier.
I’m still figuring out what, if anything, I can remove related to the belts without getting constant seat belt errors. With seats out, but all seatbelt hardware installed and harnesses connected there are no errors (to be expected). I’ll post an update if I figure a better solution (less hardware, with no errors).
With hinged cover and rear 18mm nuts removed
Here is the dual seat buckle in place with cover and 18mm nuts removed
The 1/3 seat removed
Cover for front bracket
Front bracket. You can see where it clips in on the sides then has to slide forward to clear the front metal tab
One of the shoulder belt T55 bracket bolts after removing the cover
You can see the lock washer that has to be pried open before spinning off
All the 2/3 seat covers and hardware. Not shown is the T55 bolt which was reinstalled.
The center dual buckle bracket covers and hardware. You can see the front of one push pin and the tip of the other on the cover here
1/3 seat hardware and cover. Not shown is the T55 bolt which was reinstalled.
Here’s what’s under the seats on MGV interior. Not I replaced the bull buckle in the wrong place in this picture! It should be on the forward bolts.


