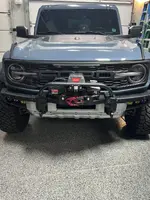
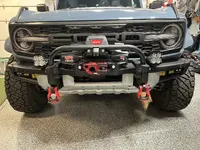
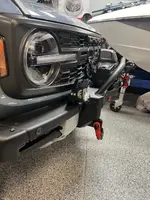
New winch with ChiliPepper mod list

Roughstock

Well-known member
Jul 1, 2023
323
Gallery
132
521
Arizona
Military
ex Army
Current Ride
2023 Shadow Black Raptor
Current Ride #2
2023 BMW GS 1250 Adventure
Hi @ChiliPepper

My other post regarding Rough Country winch mount got a bit confusing as I added to it while researching. So I thought best to start clean here.

Any help would be appreciated.

1) The Rough Country site it says the 5107 Bronco High Winch Mount doesn't fit the Raptor. It obviously does as you have it on yours.

2) I bought off your mod list - Warn 10S XD winch and cover, Rough Country High winch mount - no light bar, Factor 55 hawse 1.5 and Flatlink E (black) and M2M camera relocation kit

3) Just to confirm adaptive cruise control works and all other sensors just need to relocate camera - correct?

4) The Ford Performance winch kit says you need to update the software for the air bags. Do you believe this needs to be done for the Rough Country kit?

5) Does the winch come with enough wire to reach the up fitter switch leads at the back of the engine bay?

6) Any concern with the wind blockage and air getting to the engine?

7) I believe I read you had to modify the plastic trim to accommodate the winch mount?

8) There has been no mention of Frame Horn gusset kits/Frame Horn Reinforcements. Some say these are needed to reinforce the bumper with a winch? Example ADD frame horn kits

Wow there is a lot going on with a winch.

Do I need anything else? I know I have asked you a lot of questions. Your mod list and pics are very helpful.

Thanks
 
Last edited:
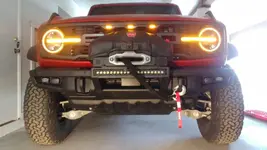
[1] ✅ Yes with slight trim mods. PN 51067 is w/ light bar, PN 51066 w/o
[2] ✅
[3] ✅ I do not have ACC, but my buddy in Cheyenne does and he has exactly the same setup as mine; no issues.
[4] I did not update any software for the airbags.
[5] ✅ It's been a while since I did the install. The winch wires only need to go to the battery. The trick there was to carefully feed them through the front grill and up through the driver wheel well, i.e. the shortest path. As I recall, the wires for the light bar were long enough to reach the firewall.
[6] ✅ Zero.
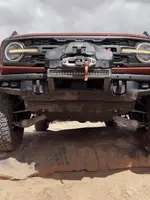
[7] ✅ Yes. There may be a write-up about that (see attached). For me, that was the hardest part, cutting up my brand-new trim after spending 6 figures. Now after 32K miles and loads of scratches, I wouldn't even give it a second thought. 🌶️ Raptor is no hanger queen.
[8] Nope. The RC mount bolts solid to the frame via the recovery hooks. Torque properly. I've had zero issues during the handful of recoveries so far.

Other Notes:
(a) The RC instructions are pretty detailed and comprehensive.
(b) Go slow and do a pro job; haste makes waste. It took me 3 days with removal, trimming (measure 3x, cut once), painting, installation, wiring, checkout and coffee breaks.
(c) Prior to grinding on sensors (step 35) verify fit. As I recall, I did not need any grinding.

[Edit: added photos]

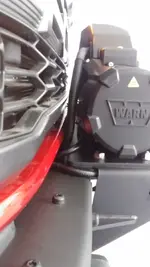
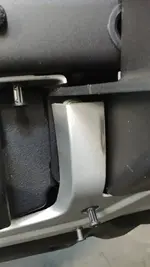
ACC clearance
0607231445b.jpgnew Screenshot_20241124-091415~2.pngused
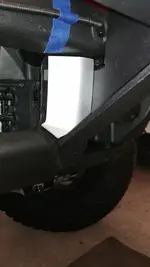
0607231448b.jpg Wiring location
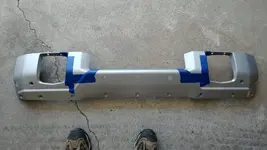
0604231308.jpg trim layout
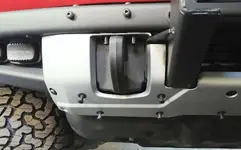
0605231253~2.jpg0605231255.jpgpost trim fit checkout
0604231541.jpg salvage of small inner trim

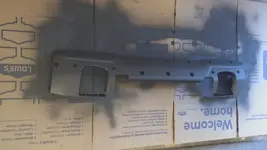
All trim, recovery hooks and bash plate painted flat black (PN 7776830) to match bumper and RC mount.
0605232015.jpg
 

Attachments

  • RC winch mount - trim locations.pdf
    201.6 KB · Views: 4
Last edited:
Here is my research that lead me to getting the RC mount. I mainly did this for my Cheyenne buddy and his Bronco Badlands, but the same thought process applies to any Bronco.
 

Attachments

  • Bronco - Winch Options.pdf
    461.9 KB · Views: 6
  • Thread Starter
  • Thread starter
  • #4
[1] ✅ Yes with slight trim mods. PN 51067 is w/ light bar, PN 51066 w/o
[2] ✅
[3] ✅ I do not have ACC, but my buddy in Cheyenne does and he has exactly the same setup as mine; no issues.
[4] I did not update any software for the airbags.
[5] ✅ It's been a while since I did the install. The winch wires only need to go to the battery. The trick there was to carefully feed them through the front grill and up through the driver wheel well, i.e. the shortest path. As I recall, the wires for the light bar were long enough to reach the firewall.
[6] ✅ Zero.
[7] ✅ Yes. There may be a write-up about that (see attached). For me, that was the hardest part, cutting up my brand-new trim after spending 6 figures. Now after 32K miles and loads of scratches, I wouldn't even give it a second thought. 🌶️ Raptor is no hanger queen.
[8] Nope. The RC mount bolts solid to the frame via the recovery hooks. Torque properly. I've had zero issues during the handful of recoveries so far.

Other Notes:
(a) The RC instructions are pretty detailed and comprehensive.
(b) Go slow and do a pro job; haste makes waste. It took me 3 days with removal, trimming (measure 3x, cut once), painting, installation, wiring, checkout and coffee breaks.
(c) Prior to grinding on sensors (step 35) verify fit. As I recall, I did not need any grinding.

[Edit: added photos]

View attachment 14140ACC clearance
View attachment 14134 Wiring location
View attachment 14129 trim layout
View attachment 14131View attachment 14132post trim fit checkout
View attachment 14130 salvage of small inner trim

All trim, recovery hooks and bash plate painted flat black (PN 7776830) to match bumper and RC mount.
View attachment 14141
Wow. Thank you kindly. You have done a lot of work and documented everything. This is of course going to make a big difference with the install. I will let you know how it goes.

Thank you again, you have made tackling the winch much easier. Appreciated.
 
  • Thread Starter
  • Thread starter
  • #5
Here is my research that lead me to getting the RC mount. I mainly did this for my Cheyenne buddy and his Bronco Badlands, but the same thought process applies to any Bronco.
Thanks for this also. Interesting.
 
  • Thread Starter
  • Thread starter
  • #6
Wow. Thank you kindly. You have done a lot of work and documented everything. This is of course going to make a big difference with the install. I will let you know how it goes.

Thank you again, you have made tackling the winch much easier. Appreciated.
With the wiring I thought you turn on the winch with the up fitter switches. I am not sure where I got that information from.

In your pics you don't have the Factor55 Hawse Fairlead 1.5 installed.

As well, you went with the 10 S rather than the 12 S. It seems the 10 S is more than ample especially if you use pulleys.

Also, thank you for the paint details.
 
Last edited:
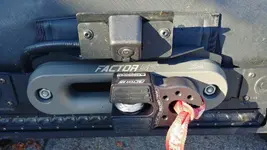
Wrt fairlead, see my "used" photo above.

Refer to Warn install and operation manual. Remote control cable controls winch.

I got a 40% Black Friday deal on the 10S in 2022, which was more than adequate for my fully loaded 🌶️ Raptor.
 
  • Thread Starter
  • Thread starter
  • #8
Wrt fairlead, see my "used" photo above.

Refer to Warn install and operation manual. Remote control cable controls winch.

I got a 40% Black Friday deal on the 10S in 2022, which was more than adequate for my fully loaded 🌶️ Raptor.
Wrt fairlead, see my "used" photo above.

Refer to Warn install and operation manual. Remote control cable controls winch.

I got a 40% Black Friday deal on the 10S in 2022, which was more than adequate for my fully loaded 🌶️ Raptor.

Great thanks, I've been doing a lot of reading. 10 S will work well.
 
  • Thread Starter
  • Thread starter
  • #9
Great thanks, I've been doing a lot of reading. 10 S will work well.
Hopefully last question.

Did you need longer bolts for the Fairlead 1.5? The details mention you may need longer bolts especially as we added the M2M camera relocate.

Thanks again. That should be it....
 
Hopefully last question.

Did you need longer bolts for the Fairlead 1.5? The details mention you may need longer bolts especially as we added the M2M camera relocate.

Thanks again. That should be it....
I don't recall if I bought longer bolts. The M2M bracket is not significant, 0.1" or 1/8". I seem to recall there was plenty of thread engagement with the WARN original bolts. The WARN fairlead is also 1.5" and the bolt holes are recessed.
 
Last edited:
  • Thread Starter
  • Thread starter
  • #11
I don't recall if I bought longer bolts. The M2M bracket is not significant, 0.1" or 1/8". I seem to recall there was penlty of thread engagement with the WARN original bolts. The WARN fairlead is also 1.5"
Oh great that is good to know. I was trying to find dimension to the Warn fairlead. It sounds like it will work just fine. Warn has upgraded their fairlead cut from an aluminum block but I figure the Factor 55 should still be an upgrade. Worth it if it keep you safer.
 
Oh great that is good to know. I was trying to find dimension to the Warn fairlead. It sounds like it will work just fine. Warn has upgraded their fairlead cut from an aluminum block but I figure the Factor 55 should still be an upgrade. Worth it if it keep you safer.
I guess those photos didn't show much detail. As shown below, the chrome WARN nut cap was replaced with a nylock nut.

1128241009_HDR.jpg1128241009a_HDR.jpg
 
  • Thread Starter
  • Thread starter
  • #13
I guess those photos didn't show much detail. As shown below, the chrome WARN nut cap was replaced with a nylock nut.

View attachment 14210View attachment 14211
Right on thanks. You read my mind. Earlier today I was looking at the Warn nut caps (on their website ), your picture and going through the RC hardware in hand and trying to figure out what I will be doing.


The only bolts I have that are not in the hardware list (from RC) are these and looking through the instructions they are for attaching the RC fairlead to the mount. Although they didn't supply the nuts. It will be interesting to see what comes with the winch. These bolt in the picture (which didn't come with nuts) are too small anyway. I can always pick up some nylocks or similar once the winch arrives on Monday and I check it all out. It seems this is the only thing I need to figure out before install to ensure I've got everything.

After speaking with Warn I decided not to go with the Factor 55 Fairlead. The guy said that the upgraded Fairlead with the XD was good. Probably not as good as the Factor 55 but reasonable. So I upgraded to the Factor 55 Ultrahook.

Thanks again.
IMG_3962.jpg
 
Last edited:
With the wiring I thought you turn on the winch with the up fitter switches. I am not sure where I got that information from.

In your pics you don't have the Factor55 Hawse Fairlead 1.5 installed.

As well, you went with the 10 S rather than the 12 S. It seems the 10 S is more than ample especially if you use pulleys.

Also, thank you for the paint details.
I’m new to this site. Here is my IAG winch bumper setup. Just installed last week. I’m very happy with it.
 

Attachments

  • IMG_5990.jpeg
    IMG_5990.jpeg
    297.9 KB · Views: 5
  • IMG_6040.jpeg
    IMG_6040.jpeg
    330.1 KB · Views: 6
After speaking with Warn I decided not to go with the Factor 55 Fairlead. The guy said that the upgraded Fairlead with the XD was good. Probably not as good as the Factor 55 but reasonable. So I upgraded to the Factor 55 Ultrahook.
True story on the fairlead. I wanted to replace the thin 3/4" ComeUp fairlead on my Jeep with the 1.5" WARN, which is why I got the Factor55 for the BRaptor.
 
Not sure what changes Warn may have made to their fairlead in the last 2 years or if this tidbit even applies on the RC plate with Camera Relo or not, but….

On the JCR plate with camera relo, you can’t mount the Warn fairlead with the Warn logo on the top due to the fairlead is bumped upward to accommodate the logo. This extra material interferes with the camera relo bracket.

Their instructions at the time indicated that you should not mount the logo upside down. Not sure if this is for safety (hard to see how this would be an issue) or their brand team didn’t want upside down logos out in the field.

I ended up with the Factor 55 fairlead FWIW
WARN fairlead not an issue with M2M camera bracket. See photo above.
 
  • Thread Starter
  • Thread starter
  • #20
Not sure what changes Warn may have made to their fairlead in the last 2 years or if this tidbit even applies on the RC plate with Camera Relo or not, but….

On the JCR plate with camera relo, you can’t mount the Warn fairlead with the Warn logo on the top due to the fairlead is bumped upward to accommodate the logo. This extra material interferes with the camera relo bracket.

Their instructions at the time indicated that you should not mount the logo upside down. Not sure if this is for safety (hard to see how this would be an issue) or their brand team didn’t want upside down logos out in the field.

I ended up with the Factor 55 fairlead FWIW
I appreciate this. According to Mountains 2 Metal and their camera relocate they show a picture with a Warn winch. This was definitely a concern I had not ordering the Factor 55 fairlead that the camera relocate would be fine. It seems to be.

Thanks for the input, it all helps. As you well know there is a lot to cover to ensure you are doing it right and have the right stuff.

I also decide to reinforce the bumper with MetalTechs reinforcements. I figured while doing the winch I may as well put these in as well. They seem to be superior to ADD's or LOD's offerings.


Top Member Reactions

Back
Top