G1D1UP
New member
- Joined
- May 29, 2025
- Messages
- 2
- Gallery
- 4
- Reaction score
- 9
- Location
- Gilbert, AZ
- Current Ride
- Bronco Raptor
Enjoyed a nice getaway at a secluded lake in Northern AZ. Then stayed a couple days at our cabin in Show Low, AZ
Follow along with the video below to see how to install our site as a web app on your home screen.
Note: This feature may not be available in some browsers.
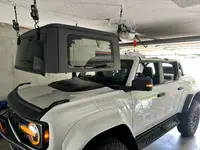
Welcome to BroncoRaptor.com!View attachment 15774
View attachment 15775
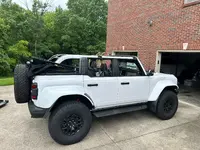
Enjoyed a nice getaway at a secluded lake in Northern AZ. Then stayed a couple days at our cabin in Show Low, AZ
View attachment 15776
 Your in a Beautiful part of our country to enjoy your Bronco Raptor! Congrats!
The close up image of the front bumper should be entered into the photo contest!Washed all the mud off and repaired some trail damage…View attachment 15757View attachment 15758View attachment 15759View attachment 15760View attachment 15761View attachment 15762View attachment 15763
John, you should read my ForScan posts about disabling the seatbelt warning screen. Works like a charm!I did something I probably shouldn’t have. It was fun. Scary too! Got out this pretty much unscathed except a surprisingly small amount of belly dragging. A few strategically placed rocks in front of front tires got me up off the belly, deflated the spare and placed a few landing boulders for the rear to drop on and I was out with no additional scraping. On a day trip on the Rubicon trail yesterday.
I also learned that if you do this and release your seatbelt, the seatbelt will refuse to redeploy. It also leaves a dialog box warning you your seatbelt isn’t on that cannot be disabled. So I couldn’t get degrees of declination to display, but it had to be shockingly close to my approach angle.
Had to drive out of this with no seatbelt though. Worked fine again once I was down. Not sure ford’s thinking on this one.

 www.broncoraptor.com
Yeah, I debated quite a while…I ended up going with VinylFoxUSA for my grill letters, they had more options and were cheaper… here’s a link.. hope it helps…I want just the R for the front grille but not willing to spend $100 (tax & shipping) to discard the F, O and D letters, LOL. If anyone wants just those letters and wants to split the cost, lemme know. I won't hold my breath.

 vinylfoxusa.com
It is flexible enabling it to conform to mating surface contour in the intended locations. The domed top clear layer of resin is 4mm thick. The 3M adhesive is very sticky, best to have it positioned correctly on first try.That' looks really good. Is it hard plastic? More than just a sticker in other words?
Being vinyl, is it holding up ok or is it going to be something I replace each year due to pock marks from debris?Yeah, I debated quite a while…I ended up going with VinylFoxUSA for my grill letters, they had more options and were cheaper… here’s a link.. hope it helps…
Ford Bronco Raptor Vinyl Grille Letters| All Patterns | '2022+
All Vinyl Fox products are made to order. Current lead time is approximately 7–10 business days. FITS: 2022+ Ford Bronco Raptor DIY Install Ready Free Lower 48 Shipping 60-Day Returns Lead Time: 1-3 Business Days Air Release Vinyl (Bubble Free) This vinyl kit was designed with installation in...
I agree, love the TufSkinz products. I may add the overhead switch console overlay, I was being cautious not to add to much Code Orange.I was looking at those as well… first round was exterior where all the Raptor emblems were located, even the rear diff R and outlined FORD grill letters- love the products so far… did you consider the overhead switch console overlay?
Interior cosmetic enhancement. I have always thought, even with the Carbon Fiber pkg, that there should have been a little more to the interior to differentiate the Raptor from the Bronco, especially in the console area.
Installed these TufSkinz interior products ordered in Code Orange with Matte finish to coordinate with all the OEM matte finishes. Decided on a theme of outlining all the control panels in the console and the headlight/ditch light panel. I'm very pleased with the TufSkinz product quality resulting in OEM appearance and durability.
The Bronco TufSkinz lettering I installed last winter are also Code Orange in the standard gloss finish.
Hints:
View attachment 15901
- Prior to application clean interior mating surface with isopropyl alcohol using a microfiber cloth. I had previously applied interior ceramic coating to all the interior plastics so I repeated this step a couple of times. The TufSkinz products stuck without any issues.
- Do a dry run (before removing adhesive covering on backside) to check product fitment and location taking into account the control panels may need removed in the future for serviceability.
- On the headlight switch panel and rear console panel tuck the edges prior to pressing onto panel as it's a snug fit, which is exactly what you want.
- On the center dash HVAC controls, from the passenger seat, I carefully aligned the upper outside edges along with around the control knobs, then gently pressed the upper outside edges enough to hold in place. Then exited the Raptor and from glove box area looked along those thin Code Orange segments to perfectly align with my finger and carefully pressed into place. Like looking down a wood 2x4 checking for straightness.
- To have your TufSkinz products in Matte finish vs Gloss, forward your order confirmation email from TufSkinz to sales@tufskinz.com to ask for Matte finish on specific product numbers in your order.
View attachment 15902
View attachment 15903
View attachment 15904
View attachment 15905
View attachment 15906
View attachment 15907
View attachment 15908
View attachment 15910
www.broncoraptor.com
Pics please.I went with some of the faux carbon fiber for these locations. Cleaned up the interior and gave it a much better look. Was never a carbon fiber fan on anything, but as an accent, I think it looks good.
What hood deflector is that ?Added new grille lettering from Rocky Mountain Graphics
View attachment 16146